No products in the cart.
Every DIY fencing job is different and presents its own unique challenges. I’m always learning and DIY fencing gives me the opportunity to be creative but also show off some perfectionism. I take pride in my work and the beauty of DIY fencing is there is something physical to show accomplishment for the day. Some questions were asked on; what I learned the hard way, what little tricks make DIY fencing easier, how can it be done faster, what type of equipment is ideal.
The biggest thing I have learned the hard way is having the proper equipment for the job. I’ll discuss more on this in a later paragraph. For years I fenced by hand, everything was done the hard way. I dug holes by hand, I rolled wire out one roll at a time carrying the roll with a pipe, lined posts out by sight and a “tight” wire. I’m thankful that I’ve found better ways of doing things. I’m constantly learning and seeking faster, more efficient ways. At times in certain situations, doing things the hard way is called for or just simply more time efficient. One great example is fixing a brace on the back side of the ranch in rough country. If I can get there with my ranger, I’ll hand dig those holes rather than spend all day trying to get a skid steer there.
 Using Quality Material
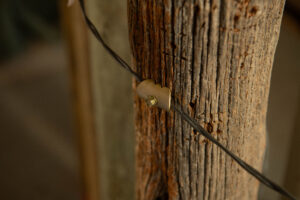
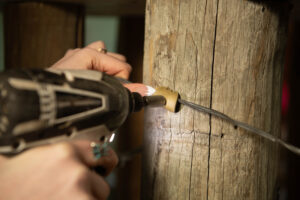
Using quality material is another lesson learned the hard way. It’s well worth the money to use quality wire, posts, and Cat’s Claw fasteners on a fence opposed to inferior material and staples. This saves time down the road in maintenance. It’s worth the time to do things the right way the first time. Cutting corners in quality or construction costs time and money in the future.
Knowing the soil, I’ve learned the hard way. The invention of post pounders has made certain soil types easier to fence in. I’ve planted railroad ties in the ground with a high water table. All I did by tamping that post in was create a hydraulic jack. The more I tamped the post got pumped out of the ground. I had to go find rock to put in the hole. I’ve planted ties in a gravel pit where I had to clean the hole out with a coffee can. By the time I got the hole deep enough it was wide enough for me to crawl down in the hole. Both places I would now just pound a tie or pipe in place and keep progressing.
I’m always learning new little tricks that make fencing easier and faster. I started using a carpenter tool belt instead of carrying a fencing bucket. I put a 12” cheater on my goldenrod fence stretcher to have that extra leverage. I build small almost square splice loops around the jaws of my fence pliers. This creates a more rigid splice loop for multiple reuses. It takes roughly 5+ solid tight wraps behind a splice to keep the wire from unwrapping due to fence tension. I got hooked on using a 8” pair of Knipex cutters to cut my wire every time. They stay sharp and are handier and faster than my fence pliers. These are just a few tricks.
 Have the Proper Tools
Having the proper equipment makes fencing so much easier and faster. I absolutely love taking my dozer down the path of the fence before starting. This clears brush and debris. It evens out the ground and creates less peaks and valleys that require extra time, material and attention. I started using a transit to sight and mark my fence line. I stake my highs, lows, and braces ahead of time that way the fence flys up. The guess work of a straight fence is removed because a transit doesn’t lie. Skid steers are amazing when it comes to digging holes, pounding posts, and carrying material. Last major handy piece of equipment is a ranger to run around with, drag wires out with, and to get into those hard to get places.
The last thing to add to the list is a pair of headphones. This allows me to listen to good music or books or anything so I can be constantly learning and keeping my mind fresh and active. These are just a few things I’ve learned on the fence line.
I sincerely hope that reading this blog post provides you with new information that will help you in your fencing endeavors, and that the tips and tricks I have provided will be useful to you.
For any additional inquiries, the team here at Cat’s Claw Fasteners is here to assist you! Feel free to email your questions to our Head Cat Collector, Ralph, at ra***@***************rs.com. And, for more informative content, be sure to read our other blogs and follow us on Facebook, Instagram, Pinterest, and Youtube!
Read Next: Screws Vs. Nails to build a picket fence
